 Last week, I started a blog checklist series—the things you should do to prepare any content for publication.
We started with 10 tips to write for humans. Now its time to shift gears and focus on writing for robots.
Humans are always the most important, but robots are what will help you in search rankings.
I call this on-page SEO—the optimization needed to help the Google spiders find you.
There are seven things you will do next. Some will take seconds, while others may take a few minutes, depending on your experience (and confidence) level.
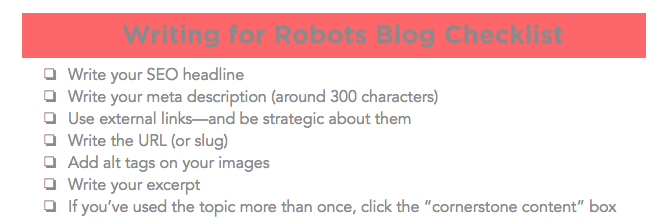
Blog Checklist #1: Write Your SEO Headline
Now that you have your snazzy headline for humans, it’s time to write your headline for the robots.
This can certainly be the same as the headline you chose for your human readers—as long as your keyword or phrase is in it.
But if you wrote a headline to motivate people to click on it and it isn’t necessarily keyword-rich, you’ll have to write one for the ‘bot overlords.
I haven’t yet decided on my keyword or SEO title for this particular article (because I’m still writing it for you), but you can see where I’d add it.
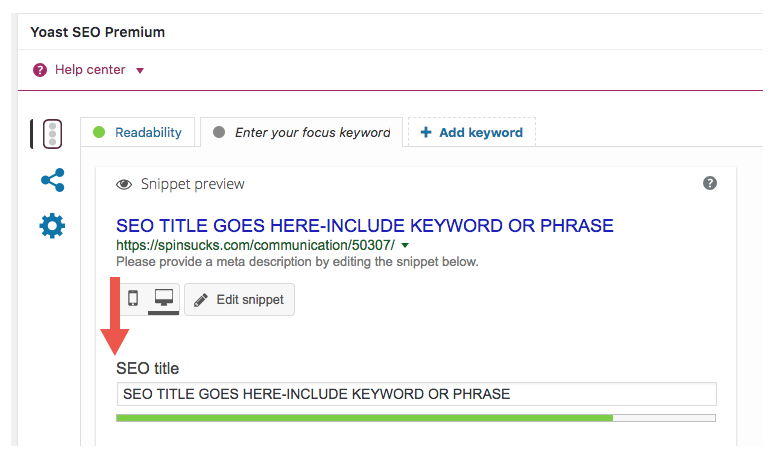
The most important part of this headline is that your keyword is included in it. The rest can be as snazzy as you like.
Blog Checklist #2: Write the Meta Description
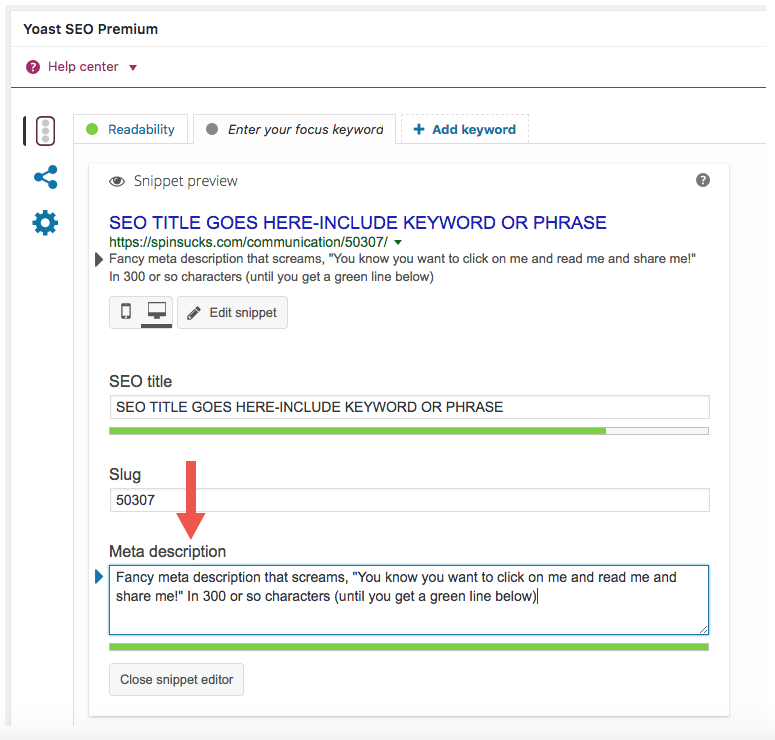
This is my favorite piece to write because it’s only 300 characters and the point is to create something appealing enough that someone would want to click on it.
The meta description is the copy you find underneath the title in a Google search.
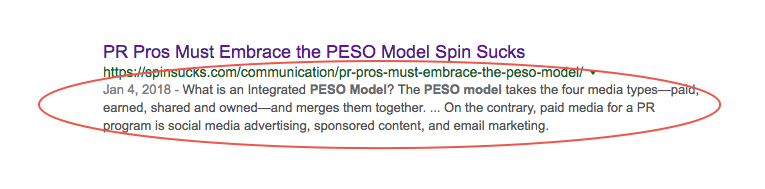
In this example, you can see “PESO model” is the keyword. It’s in the SEO title and it’s in the meta description.
(And it’s in the URL, but more on that in a minute.)
When you write your meta description, include your keyword or phrase and make it something that would compel a stranger to click on it.
Remember, this is what shows up in search so you’ll be attracting people who need what you have.
Give them what they need!
Blog Checklist #3: Use Strategic External Links
One of the things that drives me batty about media relations is the publications and bloggers who won’t include external links in their content.
They opt, instead, to link to all of their own content.
I can understand that strategy—pageviews and time spent on the site are the name of the game.
And that’s a really smart way to keep people on your site longer, and looking at more than one page.
But you can achieve the same thing with one or two strategic internal links—and achieve SEO greatness with strategic external links.
A study by Reboot found:
Outgoing relevant links to authoritative sites are considered in the algorithms and do have a positive impact on rankings.
Not to mention, most publications and blogs (unless it’s the New York Times) will notice that you’ve linked to them and will return the favor.
And, when you receive a link from a high domain authority site, your own search juice increases.
So why wouldn’t you include external links that support your opinion, hypothesis, or theory?
There isn’t a magic number of external links required.
Aim to include links that provide more context (like I did with the phrase “external link” in the first sentence of this section) or to credit quotes or information (like I did with the Reboot study).
Blog Checklist #4: Write the URL (or Slug)
Now it’s time to write your URL.
When you write directly in WordPress (which is what I do), it will automatically assign a URL.
In this case, it’s “50307” because I haven’t yet written my headline.
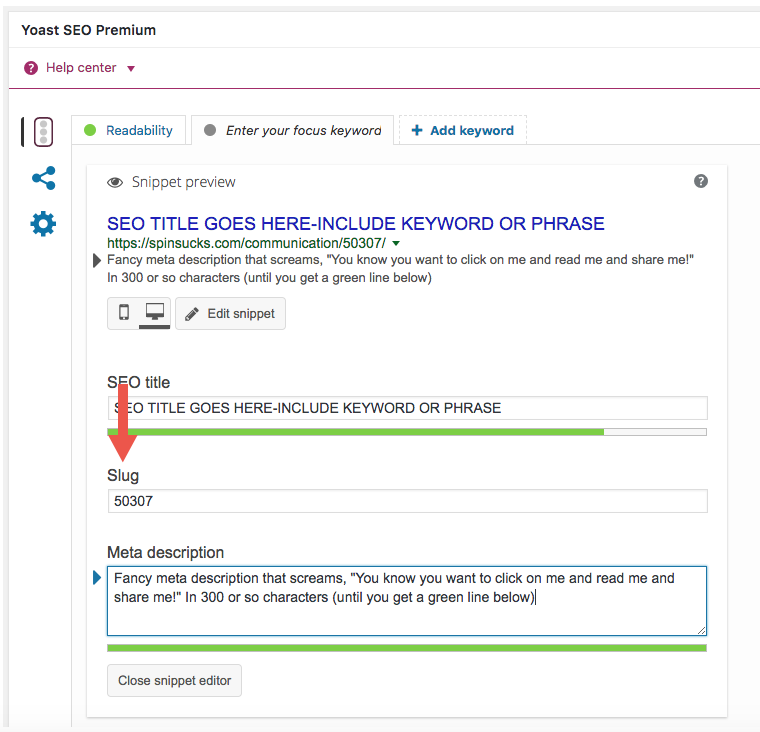
Once I write my headline and click “save draft,” it will assign a URL that matches it word-for-word.
You typically don’t want that because it may be too long, too clunky, and include stop words (such as “and,” “the,” or “or”).
See how gross that is? We don’t want that.
What we do want is something that is keyword-rich and tells Google you are the authority on the topic.
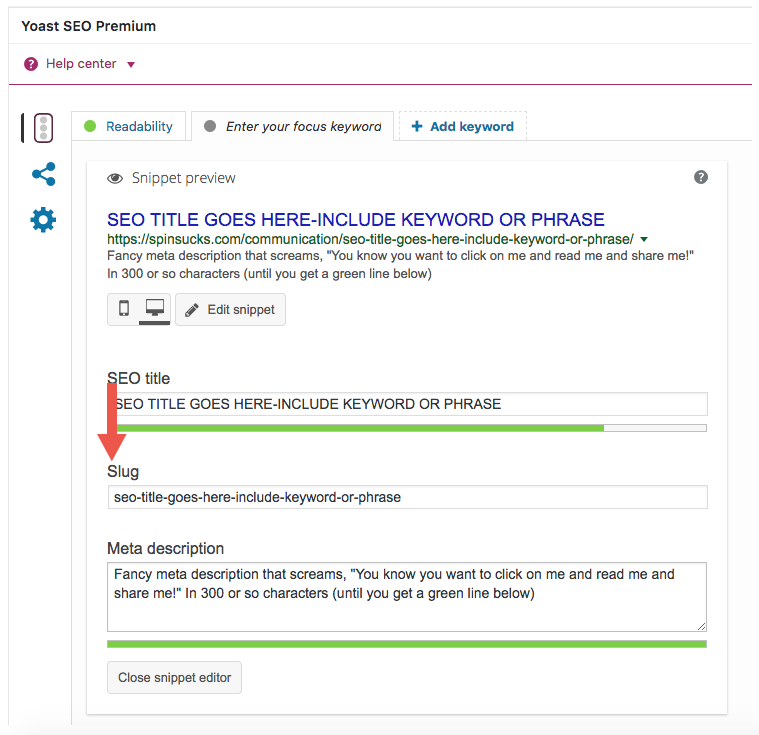
So let’s say I chose “blog checklist” as my keyword for this article and my SEO title is “The Ultimate Blog Checklist and Guide.”

I can easily change the URL to include my key phrase and provide a little more context.
I don’t want it to be the entire title because there are several stop words and it’s far too long for a URL.
This is an easy way to make it read the way you want—and include your keyword or phrase so Google has one more indication about your topic.
Blog Checklist #5: Add Alt Tags on Your Images
The first time someone told me our images needed alt tags, I was fairly certain I’d fallen asleep and woken up in Mars.
What the heck are alt tags?
Simply put, the alt tag is a description for your image. This is what tells the robot overlords what your image is about.
When you open the image in your content management system, you’ll see something that looks similar to this:

Your keyword needs to go in the “alternative text” box.
Sometimes I just copy and paste my SEO title there and other times I just use the keyword or phrase (as in this example).
It doesn’t really matter, as long as the keyword or phrase is in the alt tag.
Blog Checklist #6: Write Your Excerpt
The excerpt is what people see when they land on the home page of your blog.
Depending on how your blog is designed, it could be the short description a reason sees before clicking on the full article.
In other cases, you might not have an excerpt at all. And that’s OK. If you don’t, just skip this section.
If you do, however, you want to write something that is applicable to both humans and robots.
I almost always take our meta description and revise it to add the author’s name and something tantalizing about the article.
Blog Checklist #7: Cornerstone Content Box
Now, the last thing you want to do as you prepare your content for the robots, is consider cornerstone content.
This is content that you are an expert on—such as the PESO model for us or robots for GE.
This article you’re reading could be considered cornerstone content. It’s a gigantic piece of content on one subject.
In many cases, you’ll write about something consistently enough that you can pull it into a larger piece of content later.
Think eBooks, white papers, brochures, presentations, or studies.
If you use the Yoast plugin, it is easy for you to compile a list of cornerstone content.
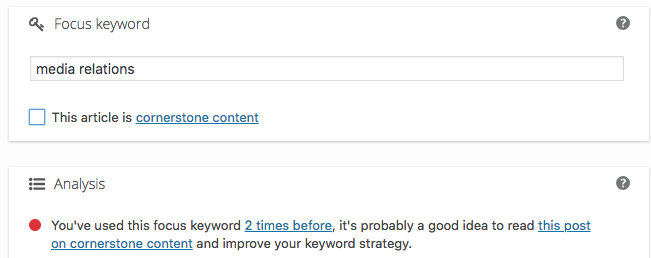
I used “media relations” as an example.
Because we write about this topic often, you can see I have a red ball next to, “You’re used this focus keyword 2 times before…”
Right above that is a box that I can check next to, “This article is cornerstone content.”
This does two things:
- Helps the search overlords know that you are an expert on the topics; and
- Gives you an incredibly easy way to find similar topics when you’re ready to sit down and create a larger piece of content.
Case in point:

If you use that “cornerstone content” box, all you have to do is click on the “cornerstone articles” and you have everything in one place.
It’s far easier than having to search your site and find things you wrote a year ago.
Use the box!
Keyword Research is the Most Important Part
And that’s it! The hardest part of all of this is choosing the right keyword—one that will work for humans and robots.
Once you have that, you can be creative for humans and crafty for robots in your content.
Next week we’ll focus on more content optimization and then round out the series with promotion.
Until then, what questions do you have?